
The Operator's Interface


This section describes the advanced authoring features accessible by operators and owners via the Palace User Software interface: * Becoming an operator * Becoming an owner * Using the Operator menu * The Windows operator avatar pop-up menu
-
NOTE: Currently, The Palace Viewer web-based client does not provide an operator interface that gives you the entire set of operator privileges. However, you can use the ~susr command to enable operator access and perform many operator tasks through the operator commands (described in Operator and Owner Commands).
Becoming an operator
To access the authoring features of the Palace software you need to be a operator, which means two things:
You become a operator by entering operator mode via The Palace client.
- You need to have access to The Palace User Software (either the Windows or Macintosh version), since operator commands are sent exclusively through The Palace software.
- You need to know the operator password for the Palace in question. If you're the local owner (server owner or Palace operator), or if you have been entrusted with the operator password for someone else's server, you're ready to begin exploring the operator powers.
* To access operator mode
Operator mode remains in effect until you disconnect from the current Palace.
- Start your Palace User Software client.
- Connect to the Palace server where your operator password is applicable.
- Select Operator Mode from the Palace client's Options Menu (select Operator for Macintosh). A window will appear, asking you to type in the operator password.
- When you enter the correct password, a new menu -- the Operator Menu -- will be added to your menu bar. If you are using the Palace User Software for Windows 95/98/NT, you also access the operator's version of the avatar menu when you right-click on somebody else's avatar (see The Windows operator avatar pop-up menu).
NOTE: Your operator status is not saved anywhere on the server. If you want to use operator or owner powers next time you sign on, you will have to enter the password again. This is a security feature; it keeps others who use your Palace client from automatically becoming operators themselves.
Becoming an owner
In a sense, owners are "superoperators" - they possess all the powers of operators, plus more. Like a operator, you enter owner mode through your Palace client.
NOTE: Often, there is only one owner of a Palace site, and that is the initial creator. However, if that person gives the owner password to others, those users also have access to owner commands. This means that even though a user is an owner, he or she does not necessarily own the Palace site or its content.* To access owner mode
Your ownerhood will remain in effect until you exit operator mode, or disconnect from the current server.
- Through your Palace client, connect to the Palace server where your owner password is applicable.
- Select Operator Mode from the Options Menu (select Operator for Macintosh). A window will appear, prompting you for the operator password.
- To become a owner on the current server, type the owner password into this window instead of the operator password.
- Whichever password you enter, the Operator Menu will appear on your menu bar.
Using the Operator menu
The Operator menu has the following options.
You have access to this option if you have owner privileges; otherwise, it is grayed out. Select this option to launch your Web browser and go directly to your Palace's Site Page Administration form on the Palace website. Here, you edit the information about your Palace Site Page in the Palace Site Directory.
This menu command causes the server to create a new room and add it to the script on the server (this may take a minute on slower systems). The new room will receive a RoomID number one higher than the highest previous RoomID used. Its default name will be New room roomID and its default background will be "Clouds.GIF." Your avatar will appear in the room.
This menu command calls up the Room Info window. This window displays a number of important room parameters that you can change while in authoring mode. These serve as "shortcuts" for key Iptscrae commands, which cause the server to alter the script for the current room.
The Room Info window: Macintosh and Windows versionsThe Room Info window has the following buttons and icons:
- To reset or cancel, click the appropriate buttons at the bottom of the screen.
- To delete the room, click Delete.
- To accept your values, click OK.
To lock your settings, click either the lock icon (for Macintosh) or check the Lock field (Windows). This locks the settings of the Room Info window, denying access to the room script, by creating a special password for the room information. Once locked, no operator or owner will be able to change these settings without first entering this special password (not even you).
The Room Info window has the following fields. Iptscrae equivalents are noted.
Options. The following options are available for both the Windows and Macintosh versions. On Windows, the options are listed as fields on the Room Info window. On Macintosh, select the Options right-dropdown field.
- ID
The identification number assigned to the current room appears here. You can change the ID by typing into this box. Iptscrae Equivalent: ROOMID numberNOTE: This password, like all Palace-related passwords, is saved in an encrypted format in the server's script file. The fact that these passwords are encrypted protects their integrity even if your script is shared or otherwise distributed. If you forget one of your passwords, you can remove the lock by deleting the line responsible for locking the room in the first place. To make this change, simply open the script file with any text editor and delete the appropriate line in the specific room. It will look like this:
LOCKED "weird_garbled_password"
- Name
Enter a name for the room.- Picture (Windows)
- Pict (Macintosh)
Enter the name of a background picture for the room. If you are unsure of the exact name or location of the graphic you want to use, click Browse (Windows) or PICTs (Macintosh).Background pictures in The Palace must be 512 by 384 pixels in size, and can be either in JPEG or GIF format. However, earlier Palace User Software clients (versions earlier than Macintosh 2.2.1 or Windows 3.5) can only use GIFs. If you want these earlier client versions to be able to access your room art, you must supply a GIF version of the file as well, and the file must conform to the Palace palette (this can be extracted from any of the original Palace artwork, or downloaded from various Palace-related websites.)To support earlier clients, always have this GIF available, and also name the file filename.gif in this field. Clients that support JPEGs will bypass the GIF file and always look for the JPEG format of the file first, even if the file name has a .gif extension in this field. Note that JPEGs do not need to (and should not) conform to The Palace Palette. The file extension should be in lower case.- Browse (Windows version)
- PICT (Macintosh version)
This button calls up a window allowing you to search your system for graphics to use in the Picture field. The name of the file selected here will be loaded into the Picture field automatically.- Artist
Enter the name of the artist(s) responsible for the art used in the room. Currently the contents of this control are accessible only to operators. Iptscrae Equivalent: ARTIST "artistName"New Door
- Private
Check this field to hide the number of people in the room. Generally, when a user looks in the Rooms window (via the client's Options Menu), each room is shown with a number representing the number of people currently in that room. Private rooms, on the other hand, possess a dash instead of a number. The only way to tell the number of users in a private room is to enter it.- No Painting (Windows)
- No Painting Allowed (Macintosh)
Check this field to prohibit painting/drawing in the room (except for operators). It is a good idea to set painting off in rooms with a large amount of scripted activity (looping alarms, for example); this is because painting can seriously affect the speed of events in the room.- No User Scripts
Check this field to prohibit user scripts (also known as Cyborg Scripts) in the room. It's a good idea to turn user scripts off in rooms that already possess a lot of scripted activity (continual SETALARM-ON ALARM loops, for example). You might also want turn scripts off in rooms where large numbers of people are expected to gather, as these scripts can seriously affect the speed of events in the room.- Hidden (Windows)
- Hidden From Room List (Macintosh)
Check this field to prevent the room from showing up in the Rooms window. For all intents and purposes, the room doesn't exist for non-operators (operators and owners still see all rooms in the Palace).- No Guests (Windows)
- No Guests Allowed (Macintosh)
Check this field to prohibit guests from entering the room (making the room into a Members-Only room).Select this menu option to create a new door in the room. The new door appears as a large square in the middle of the screen, and must be moved to the desired place and size. The new door automatically receives a unique ID number, one higher than the highest ID already used on a door in the current room. Your new door is considered by default to be a Passage to another room (hence the name of this menu command).
NOTE: Doors belong to the general object class known as Spots (short for "hotspots"). In other words, a door is a special type of Spot. As a result, the two words are often used loosely or interchangeably. The differences, however, are pretty significant. True doors are also known as Passages. They specialize in allowing movement between rooms, and possess built-in "door-like" features (i.e., they can be opened and closed, locked and unlocked, and passed through). In addition, they cause the cursor to change to a "pointing hand" when they're rolled over. However (and most importantly) they cannot run scripts.
Spots (of any non-Door variety) can run scripts, but possess no built-in responses for opening/closing, locking, and other door-like behavior. While much of this behavior can be mimicked with Iptscrae, there is currently no way to make a Spot change the mouse cursor in response to a "rollover" event.This menu option calls up the Door Info window for the currently-selected door/spot, and can also be accessed by double-clicking on the door/spot in question. To access this menu option, select the door outline first.
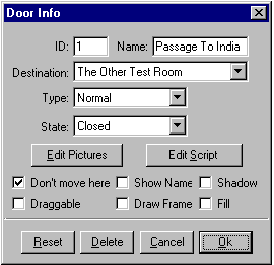
The Door Info window displays a number of important parameters that you can change while in Authoring Mode (Authoring Mode menu option on Windows, Authoring on Macintosh). Like the Room Info fields, these fields are actually shortcuts for Iptscrae commands, causing the server to alter the script for the selected door/spot.
The Door Info window: Windows (top) and Macintosh (bottom) versionsThe exact names and positions of these fields and buttons differ somewhat from the Windows to the Macintosh version. This window has the following fields:
- ID
The identification number assigned to the current door/spot appears here. You can change the ID by typing into this box.NOTE: All doors and spots must possess ID numbers, and all ID numbers must be unique within their own rooms. Using the same ID number for two spots in the same room will cause your scripts to behave erratically. Iptscrae Equivalent: ID number- Name
This textbox allows you to type in (or change) the name of the currently-selected door/spot. Unlike ID numbers, names are optional. Iptscrae Equivalent: NAME "doorName"- Dest (Macintosh version)
- Destination (Windows version)
If the current selection is a Passage, you will probably want it to have a destination. You can select the destination of a Passage by choosing one of your existing rooms from the dropdown (or right-arrow popup on the Macintosh) list.The Macintosh version also lets you choose the destination room by entering its ID number. If your current selection is a Bolt, you'll want to set its destination to equal the ID number of the Lockable Door it toggles.- Edit Pictures (Windows version)
- PICTs (Macintosh version)
This button calls up a window known as the Pictures List, which allows you to assign graphics to the door/spot in question. These graphics are associated sequentially with the various possible States of the door/spot (as controlled by the SETSPOTSTATE and SETSPOTSTATELOCAL commands). For more information, see Authoring.- Type
This control allows you to change your door to a spot, or to another type of door. Clicking here causes a drop-down list to appear, from which you may choose one of the following types:
Door/Spot Types- State
Doors and Spots can possess a number of different states. These states are referred to by number: for all Shutable or Lockable doors, a state of 0 (zero) equals Open, and a state of 1 (one) equals Closed (or Shut on Macintosh). A door's state may be changed by using the Iptscrae commands SETSPOTSTATE or SETSPOTSTATELOCAL. For example, if ID number 3 corresponds to a Shutable Door, you can shut it by entering the following command via the input box in The Palace client:/ 1 3 SETSPOTSTATEFor most doors, Open and Closed/Shut cover the territory pretty well, but Normal doors (otherwise known as Spots) may possess up to 32 states, beginning with state 0 and ending with state 31. If, in the above example, ID number 3 corresponded a Normal Spot, the same line of input typed above would cause it to enter "state 1," which might have all kinds of results depending on the script attached to it. Most often, such state-changes are used to change the graphic displayed in the spot.Since a spot's state remains the same until it is deliberately changed (even if you leave the room and come back), it may be used as a kind of room-level "global variable." You can determine the current state of any spot or door by using the GETSPOTSTATE command. The following line of code, for instance, will cause a spot to move one step forward through a three-state loop ( 0 - 1 - 2 - 0 - 1 - 2 - etc. ) each time it executes:{ 0 ME SETSPOTSTATE } { ME GETSPOTSTATE 1 + ME SETSPOTSTATE }
ME GETSPOTSTATE 2 >= IFELSEWithin an actual script file, this line would usually be written out in an indented format as shown below, making the code a little easier to read and maintain. It would also be placed within an event handler such as ON ALARM:ON ALARM {
{
0 ME SETSPOTSTATE
} {
ME GETSPOTSTATE 1 + ME SETSPOTSTATE
} ME GETSPOTSTATE 2 >= IFELSE
60 ME SETALARM
}- Edit Script (Windows version)
- Script... (Macintosh version)
Click this button to display the scripting window, where you may edit the part of your script that corresponds to the currently-selected spot. Be sure to make a backup copy of your script before editing it in any way. The Scripting window (Windows version)
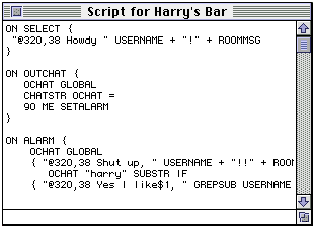 The Scripting Window (Macintosh version)Door Options. The Door Info window has several options to set for doors. Windows users access these directly through the associated fields on the window. For Macintosh users, these options reside in the list accessed by clicking the right arrow in the Options field.
Layering
- Don't Move Here
This control, when checked, keeps users from moving onto the door/spot.- Draggable
Currently unimplemented.- Show Name
This control, when checked, causes the name of the door/spot (as explained above) to appear superimposed on the image in the View Screen. This is especially useful for creating links to other Palaces or web pages.- Draw Frame
This control, when checked, causes the outline of the door/spot to be visible to all users. It appears as a thin black line.- Shadow
Currently unimplemented.- Fill
Currently unimplemented.This command brings up the Layering Submenu (Door Layers on the Macintosh), which contains four choices: Move To Bottom, Move Backward, Move Forward, and Move to Top. These cause the program to literally change the placement of the selected door/spot in the script, otherwise known as the "Z-Order." The Z-Order is the order in which spots are laid down; it is derived from the order in which they appear in the script (which does not necessarily follow their ID numbers). There are two main reasons for using these commands. First, they allow you to select a spot even if it's buried beneath another one. Second, when one spot does overlap another one, any graphics associated with it will cover up the other spot's graphics. By pushing the top spot beneath the bottom one ("Send to Back"), you cause the associated graphics to swap places as well.
Changes made via the Layering commands are retained in the server script. To test this function, try the following:
This menu item causes you to enter authoring mode. In this mode, the outlines of all doors and spots become visible to you, and clicking on them does not activate them. Instead, until you turn authoring mode off, clicking on a door or spot merely selects it for subsequent operations; you can double-click on any door or spot to bring up the Door Info window for that door. For Windows users, the hotkey combination for this command is Control-A. For Macintosh users, it's Command-` (single backquote).
- Make a room with two overlapping spots called Spot1 and Spot2. Spot2 should be on top.
- Select Authoring Mode (Authoring on Macintosh) from the Operator menu to go into authoring mode, and associate a graphic with each spot. The graphic for Spot2 will overlap the graphic for Spot1.
- Select Spot2 and select Move to Bottom from the Layering submenu. Immediately, the graphic associated with Spot2 will be overlapped by the graphic for Spot1.
- Exit the Palace, kill the server and examine the script file with any text editor. You'll see that Spot2 now appears before Spot1 in the script.


The Windows operator avatar pop-up menu
If you are using the Palace User Software client for Windows 95/98/NT, you have special options when bringing up somebody's avatar pop-up menu (right-click on their avatar for this menu). You access the following menu:
These options correspond with operator commands. For a description of a particular command, see Palace Command Summary.
 del.icio.us |
 Digg
Digg

Post your comment