The Palace Client Interface
This section describes the general structure of the Palace User
Interface:
Elements of the main window
The Palace has the following main window:
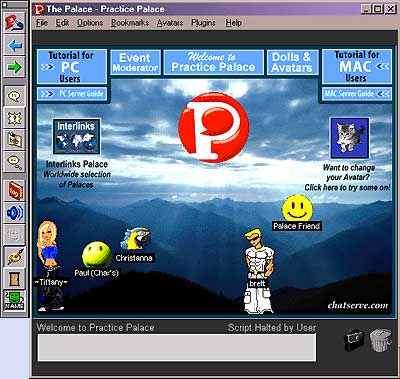
The Palace client interface
The View Screen
A large rectangular area known as the View Screen dominates the
Palace interface. This is where all graphic action takes place. As you move from room to
room within a Palace site, the View Screen is filled with a picture representing the
background of that room. All avatars and props in the room appear superimposed on this
background.
NOTE:
Room Graphics and Download Time.
Most Palace sites use at least one or two pieces of original art. When you enter the
corresponding rooms, these pictures will be automatically downloaded into the Pictures
folders located inside your Palaceroot Media PalaceName
folders.
If you already possess the graphics for the room you are entering (i.e., if you've been
there before) this transition is completely transparent and takes almost no time at all.
If you enter a room you've never seen before, however, you'll have to wait for the room's
background image to download; a process which generally takes 15 to 60 seconds on a 28.8k
baud modem. While the image is downloading, the room's background will be black and a
progress bar will appear in the bottom part of the View Screen, indicating the status of
the download. Props and avatars, being smaller in file size, will usually become visible
before the room's background pops into place.
The Toolbox
The Toolbox, which is accessed by selecting Toolbox
from the Options Menu, provides simple shortcuts for many of the
most commonly used commands.
Most of the Toolbox buttons duplicate menu
commands. For example, clicking on the Connect to a Palace button is equivalent to
selecting Connect to a Palace from the File
Menu.
The toolbox has the following buttons.
| Button |
Description |
 |
Connect To A Palace
This button is used to enter a Palace site. Clicking here will cause a
dialog box to appear asking for the address you wish to connect to. The last eight Palace
addresses you have visited will appear as choices in the drop-down listbox. If the
destination Palace Server is running on the same computer, you can connect directly by
pressing the Shift key while you click on this button. See Connecting
to Palace Sites for more information.
Depending on your Dialup Networking settings, Windows may display the
Connection Operator; press the Escape key or click Cancel to
abort the dialup and connect directly to your own Palace. |
 |
Go Back
This button moves you back to the previously-visited room. If you have
just entered a new Palace site, this button may be used to return to the previous Palace
site as well (via the standard entrance -- not the room you were last in). The hotkey
combination for this command is Control-B. |
 |
Go Forward
This button returns you to the room you were in prior to doing a Go
Back. Like the Go Back button, it may be used to jump to another Palace site. The hotkey
combination for this command is Control-O. |
 |
Talk Balloon
This button causes your speech to be displayed in a normal
"talking" balloon. |
 |
Shout Balloon
This button causes your speech to be displayed in a spiky balloon,
useful for "shouting". |
 |
Sign Balloon
This button causes your speech to be displayed in a rectangular
"sign" balloon, which remains on the screen until you say something else. |
 |
Thought Balloon
This button causes your speech to be displayed in a cloud-like
"thought" balloon. |
 |
Log Window
This button opens and closes your Log Window,
allowing you to read chat that has disappeared from the View Screen. The hotkey
combination for this command is Control-L. Note that you can save the contents of your Log Window by selecting Log to File from the
File Menu. |
 |
Sounds Window
This button toggles your Sound List window
open and closed. The Sounds window lists all sounds in your PalacerootMediaSounds
folder, as well as those in PalacerootMediaPalaceNameSounds.
This means that different sounds may be available on different Palace sites. You can play
a sound by double-clicking on it or by selecting it and then clicking Play.
The hotkey combination for this command is Control-Y. See Playing
sounds for more information. |
 |
Face Window
This button opens and closes your Choose an Avatar
window, where you can change your expression and face color. This window may be kept open
while moving around in the Palace, so you can change your appearance almost instantly. See
Changing expression and color for more information. |
 |
Paint Window
This button opens and closes the room drawing tools, which is a
floating window containing a number of special tools for drawing directly on the screen.
The hotkey combination for this command is Control-D. See The
room drawing tools for more information. |
 |
Show Doors
This button toggles all door outlines in the current room between
visible and invisible states. You can do the same thing temporarily by simultaneously
holding down the Control and Shift keys. |
 |
Show Names
This button toggles all nametags in the
current room between visible and invisible (a nametag is a small label attached to a
person's avatar, indicating their user name). You can do the same thing temporarily by
simultaneously holding down the Alt and Control keys. |
The Input Box
The long, thin box beneath the View Screen is known as the Input
Box. This is where you type in anything you want to say (Palace members can enter Iptscrae
commands from this box as well). To activate the Input Box, simply click anywhere in it;
the box lights up and a cursor-bar appears, awaiting your input. You can toggle the
program's focus back and forth between the Input Box and the View Screen by pressing the
Tab key.
The Status Bar
The area just between the Input Box and the View Screen is known as
the Status Bar. The Status Bar typically displays the following information:
Under certain conditions the Status Bar will display error messages
(when the connection is refused, for instance, or when the server goes down). The Status
Bar may also be scripted (by the "operators" of a site) to display specific
messages, greetings, marquees, and other text.
The Icons
To the right of the Input Box are two icons: a suitcase and a trash
can. These icons are used to activate features that operate independently of the windows.
 |
The Suitcase
Clicking on this icon opens the Prop window, giving you access to your current collection
of props. This lets you add, edit, create, and remove props from your prop window. |
 |
The Trash Can
Use this icon to delete props. To delete a prop, drag it to the trashcan. |
The Menus
This section describes the functions of all menu commands in the
Palace interface.
The File Menu
The File Menu contains commands for
entering and leaving the Palace. In addition it contains file-oriented commands, such as
logging your conversations and saving your avatars.
Connect to a Palace
Use this option to bring up the Palace connect window, which you can
use to sign on to a Palace site.
Disconnect
This command disconnects you from the current Palace site without
exiting the program.
Save Avatar
This command opens the Avatar window,
allowing you to save your current avatar (or wear a different one).
Open Log File | Close Log File
This command toggles your log file open and closed. A log file
records all chat text and commands received to a file on your hard disk. Note that this is
not the same thing as your Log Window, which disappears as soon
as you exit the Palace software.
Compress Prop File
As you travel from Palace to Palace, your prop file (palace.prp) acts as a "cache," storing copies of new props
encountered along the way and speeding the display process for already-seen props. This
causes the file to grow as you proceed. The Palace software automatically compresses the
prop file once every two weeks, but if you're a serious Palace-hopper you may want to do
this more often.
Child Lock
This command brings up a dialog box that allows you to set a
password for using your Palace software. Do not forget this password -- once you've set
it, you will be asked to supply it every time you launch the Palace software.
Reload Script
This command reloads your cyborg.ipt file
-- the only Palace datafile you can edit while online. You can edit your
cyborg.ipt file at any time with any ASCII word processor (running in another
window), save it and return to The Palace software, but your changes will not become
effective until you select Reload Script.
Enter Registration Code
This command allows you to enter in your unique membership key,
giving you access to the members-only features of the Palace software. Note that
membership is free. You obtain your registration code online at the Palace website (register.palaceplanet.net).
Exit
This command disconnects you from the current Palace site and exits
the Palace software.
The Edit Menu
The Edit Menu contains the standard
Windows-based editing commands, as well as the important Preferences
window.
Cut
This command allows you to cut text from the Input Box. It can also
be used for graphic functions, such as when working in the prop editor. The hotkey
combination for this command is Control-X.
Copy
This command allows you to copy text from the Input Box or the Log Window. It can also be used for graphic functions, such as when
working in the prop editor. The hotkey combination for this command is Control-C.
Paste
This command allows you to paste text into the Input Box. It can
also be used for graphic functions, such as when working in the Prop Editor. The hotkey
combination for this command is Control-V.
Paste Multiple Props
This command allows you to paste oversized graphics into the Prop
window, where they are divided into individual props. The maximum size graphic that can be
handled is 132 by 132 pixels.
Clear Log
This command clears the current contents of the Log
Window. The Log File (if you are keeping one) is not affected.
Edit Profile Page
This feature is currently not available.
Preferences
This brings up a dialog box allowing you to set the following
options:
The Preferences window
The Preferences window has the following
fields.
Autoshow Names
Toggles the display of user names in the View Screen. You can make these names appear
temporarily by holding down the Alt and Control keys. You can also toggle this option by
clicking on the Show Names button in the Toolbox.
Download Graphics
Instructs the Palace to request images for new rooms you enter. If this option is
unchecked, new rooms will appear black in your View Screen.
Show Tooltips
Determines whether or not Tooltips are displayed when the mouse pauses over a button in
the Toolbox.
Tinted Balloons
When checked, this option causes all cartoon balloons to appear filled with color (by
default they are white).
Allow Animation
This option allows you to view "animated props" (multiple-frame sequences of
props which create the illusion of motion or action). If not checked, only the first frame
of any animated prop sequence will be seen.
Show Guests in User List
This option determines whether the User List will display the
names of all users (both guests and members), or the names of members only.
Change Font
Clicking on this button displays a standard Windows "font dialog box",
allowing you to set the font (including typeface, size and style) used to display all
Palace-based text (including all cartoon balloons, user names and hotspot names).
Balloon Delay
Modifies the base length of time that cartoon balloons will be displayed. Three
durations are available (Slow, Medium and Fast). Note that the duration of any message is
based upon the length of the message itself, modified locally by this setting.
Palace Starts With
All Palace addresses have two parts: a URL (domain name or numeric IP) and a port
number. The two input boxes in this area allow you to enter this information so that you
can connect to the specified Palace site. This area also includes some shortcuts to help
make connecting even easier. The dropdown list on the left recalls the names of the last
eight Palace sites you've visited; these can be selecting simply by clicking on them and
then clicking Ok. You can also set a "Home Palace"
which will be entered automatically whenever you launch the Palace software (just like a
"Home Page" in your web browser). To do this, check the Home
Palace field and type in the address and port number desired.Palace UPGRADER users
have the Practice Palace automatically set as "Home Palace"
NOTE:
Note that the port number (to the right of the server
address proper) is set by the operators of the site in question: it is almost always
"9998." If you cannot get into a known Palace site, contact the operators and
make sure you're pointed at the correct port number.
The Options Menu
The Options Menu contains various commands
for controlling the behavior of the software, as well as several means of transportation
throughout Palace sites.
Show Names
This command, like the Show Names button in the Toolbox, toggles the
display of user names in the View Screen. To make user names appear temporarily, hold down
the Alt and Control keys.
Sound On/Off
This command toggles all sound on and off. The hotkey combination
for this command is Control-S.
Play A Sound
This command opens your Sounds window. The hotkey combination for
this command is Control-Y. You can also display or hide the Sound window by clicking on
the Sound Window button in the Toolbox.
Full Screen
This command toggles between a maximized display and a windowed
display.
Go Back
This command moves you back to the previous room visited. You can do
the same thing by clicking on the Go Back button in the Toolbox. The hotkey combination
for this command is Control-B.
Go Forward
This command functions identically to the Go Forward button in the
Toolbox, returning you to the room you were in prior to doing a "Go Back," The
hotkey combination for this command is Control-O.
Find User...
Select this option to open/close the User List
window. The User List displays a list of all people logged into
the current Palace site, and the names of the rooms they are in.
User List (Operator Mode)
Clicking on a user's name in this window causes you to enter ESP
Mode with that person: you may now speak to them just as though you were whispering, no
matter where you both are in the Palace.
Clicking on the User column sorts the list
alphabetically by user name. Clicking on the Location column
sorts the list by room name.
To instantly teleport yourself to another avatar's location,
double-click on its name, or select its name and then click Goto.
Exception: rooms marked "Private" cannot be entered (except by operators and
owners).
Note that the operator mode adds an additional Kill
button.
The hotkey combination for this command is Control-F.
GoTo Site Page...
This feature is currently not available: sitepages can be found in the
Palace Directory or ask an operator where the Palace you are in has its website.
Goto Room...
Select this option to open/close the Room List
window. The Room List displays a list of all rooms in the
current Palace site, and the number of users in each room (regardless of their membership
status).

Room List
When opened, this list displays all non-hidden rooms in their
"natural" order (that is, the order in which they appear in the server's Pserver.dat file). Operators and owners will see all rooms, hidden or
otherwise.
Clicking on the Room column sorts the list
alphabetically by room name. Clicking on the Users column sorts
the list by number of users. To return the Room List to its
initial order, close it and open it again.
To instantly teleport yourself to another room, double-click on its
name. Exception: rooms marked "Private" cannot be entered (except by operators
and owners).
The hotkey combination for this command is Control-G.
Toolbox
This command opens and closes the Toolbox. The hotkey combination
for this command is Control-T. For more information, see earlier in this guide.
Show Tooltips
This command toggles the display of tooltips when holding the mouse
over a button in the Toolbox.
Draw
This command opens and closes the room drawing tools window. You can
do the same thing by clicking on the Draw window button in the Toolbox. The hotkey
combination for this command is Control-D. See the following section on the Room
drawing tools for more information.
Log Window
This command toggles your Log Window open
and closed. You can do the same thing by clicking on the Log Window
button in the Toolbox.
Prop Window
This command brings up your Prop window. The hotkey combination for
this command is Control-P. You can do the same thing by clicking on the suitcase icon at
the bottom right of your window.
Operator Mode
This command opens a dialog box asking for the operator (or owner)
password. Operators and owners have special powers and capabilities beyond those of
registered members; there are different operators and owners (and passwords!) at each
Palace site. If the password is entered correctly, the Operator
menu is added to your menu bar. The hotkey combination for this command is Control-W.
The Bookmarks Menu
Use the options in the Bookmarks Menu to
travel quickly and easily from Palace to Palace.
Add Palace to Bookmark
This command adds the current Palace address to the list in your Bookmarks window. Whenever a new bookmark is added, the Palace name
appears beneath the separator bar at the bottom of this menu, enabling you to travel there
with a click of the mouse.
Edit Bookmarks...
This option displays the Bookmarks window.
The Bookmarks window lets you select a Palace site to travel to
without requiring you to disconnect or remember the URL. To travel to any Palace on the
list, simply double-click on its name, or select the Palace desired and click Goto. To remove a Palace site from the list, select it and click Delete. To close the Bookmarks window, click
either Close or on the small box in the upper left corner of the
window.
Channel Guide
This option is currently not available, please check the Palace Directory for Palace listings.
Palace Directory
This command automatically launches your web browser and takes you
to the Palace Site Directory..
List of Palaces
The Bookmarks menu lists a selection of Palace Servers and your recently-visited and bookmarked Palaces. Select one of these to go to that Palace.
The Avatars Menu
Guest Avatars...
Select this option to bring up the Choose an
Avatar window. See Changing expression and color
for more information.
Member Avatars...
Select this option to bring up the Avatars
window. See Saving and wearing your new avatar
for more information.
Change Avatar Name...
Select this option to change your avatar name.
The Operator Menu
This menu appears when you enter operator or owner mode (select Operator Mode from the Options menu, then
enter the operator or owner password). The Operator Menu
provides access to a set of advanced functions beyond the needs and rights of typical
Palace members. Operators and owners are the "managers" and
"proprietors" of the various sites in the Palace network. Anyone with a Palace
Server or Palace Personal Server (and an IP address) can open a Palace site and become its
owner, and then give the site's operator password out to trusted individuals. Therefore,
each Palace site has at least one owner, and most possess operators as well.
NOTE:
The Operator Menu appears on
your menu bar only if you are currently an operator or owner on the Palace site in
question. To access this menu, select Operator Mode from the Options menu, and then enter the operator/owner password in the
resulting dialog window.
The commands in this menu provide operators (or owners) with various
"superpowers" in the form of special commands and authorial control over their
Palace sites. Since proper utilization of these commands requires an in-depth
understanding of the Server software, this topic is not treated here. For information on
operator commands and the operator menu, see The Palace Operator's Guide.
The Plugins Menu
The Plugins Menu includes an entry for
each of your Palace Plugins -- small programs that enhance the
functionality of the Palace software.
To appear in this menu, your Plugins must be installed in the
Palace root folderPlugins folder. This is where they
are installed by default. However, if you wish, you can place them in
PluginsStartup; this will cause them to launch automatically when you start the
Palace software, instead of waiting for you to select them from the Plugins
Menu.
The Help Menu
The Help Menu consists of a number of links that, when clicked, will
take you to the appropriate page at The Palace Planet website. (UPGRADER users only) The topics covered include:
Quick Reference
User Guide
FAQ
Software Update
Discussion Groups
Communities.com
About the Palace
Hotkey combinations
The following hotkey combinations are available to users:
| Key |
Description |
| Tab key |
Toggles focus between the Input Box and the View
Screen. |
| Up Arrow key |
When the focus is on the Input Box, this pages back
through your previously typed statements. When the focus is on the View Screen, the arrow
keys allow you to move your avatar around on the screen. |
| Down Arrow key |
When the focus is on the Input Box, this pages forward
through your previously typed statements. When the focus is on the View Screen, the arrow
keys allow you to move your avatar around on the screen. |
| Esq. key |
Clears the Input Box. |
| Alt and Control keys |
If the Autoshow Names option
is unchecked (in the Preferences Dialog Box), this hotkey
combination temporarily displays the names of all people in the current room. If Autoshow Names is checked, this combination causes the names to
temporarily disappear. |
| Control and Shift keys |
When held down simultaneously, these keys cause the
outlines of all doors in the current room to become visible. |
The room drawing tools
The
Palace client provides room drawing tools, where you can paint and draw in the room you
are currently visiting. Both the room and the Palace site must have Painting privileges
set on for you to do this. To access the drawing tools, click the Palette icon on your
Toolbox, or select Draw from the Options
menu.
The room drawing tools
Everybody in the room sees whatever is painted. However, operators
and owners can turn painting off in particular rooms, or on a site-wide basis. Some Palace
operators consider painting to be a "nuisance" activity, and prefer to turn it
off completely.
| Tool |
Description |
| Pencil | Filled region |
This tools lets you draw in various colors and line
sizes. It has two states: Pencil and Filled Region. The Pencil tool is active when no
colored area appears around the pencil. The Filled Region tool (activated when a colored
area does appear around the pencil operates similarly, but turns the region drawn into a
closed shape. |
| Detonator |
When you click this button, it deletes the last line
that was drawn, whether it was created by hand or by a script. Double-click this button to
delete all drawing on this screen. |
| Layerer |
You can draw either behind or in front of avatars.
Click this button to toggle the pen between these two layers. |
| Line Sizer |
This button changes the width of the Pencil and Filled
Region tools. The center diagonal line is the current width. To increase the line size,
click the line in the upper right corner. To decrease the width, click the line in the
lower left corner. |
| Palette |
The Palette tool lets you select a drawing color from
the Palace palette. |
| Eyedropper |
Although not visible as a tool, there is an eyedropper
tool available for selecting colors directly off the screen image. The cursor changes to
an eyedropper when you press both Control and the mouse button simultaneously anywhere in
the View screen, no matter which tool is selected. The color that the cursor is pointing
to becomes the current drawing color. This is useful for extending a particular color you
see on the screen. |
The prop editor
The prop editor lets you create and edit images for props and avatars.
Like the room drawing tools, it has a set of drawing tools and a color palette. To access
the prop editor, open your prop window (click the suitcase icon at the bottom right of
your screen), and click New. Or, select an existing prop on your
prop window, and click Edit.
The following picture shows the prop editor tools:
Some of these tools have special functions, or
respond differently when certain key combinations are pressed. The following table
describes the prop editor's tools.
| Tool |
Description |
| The Pencil Tool |
Use this tool for drawing or editing details. To
constrain the pencil to a straight line, hold down the Shift key while drawing. To turn
the pencil into a paint bucket, hold down the Alt key. To turn the pencil into an
eyedropper for picking up colors, hold down the Control key. |
| The Eraser Tool |
Use this tool to create transparent areas. Note that
erased portions are transparent; they allow whatever is behind them to show through. To
"pour transparency" into solid-colored areas of your prop, hold down the Alt
key. |
| The Selector Tool |
Use this tool to move or delete sections. Click and
hold down the mouse button down at one corner of the desired area, drag to the opposite
corner (with the mouse button still depressed), and release. The selected area may now be
moved around, or removed with the Delete key. |
| The Line Sizer Tool |
Use this tool to change the pencil and eraser size. The
diagonal line in the center of this button indicates the current size of the pencil and
eraser. To increase the line size, click in the upper-right corner of the button. To
decrease it, click in the lower-left. |
| The Palette |
Select the color you want activate; that is, the one
the pencil will draw with. |
| Prop Name |
Enter a name for the prop if desired. You can then use
this name in scripts. For Palace members the prop's name may be especially important,
since there are Iptscrae commands that can be used to manipulate props as long as their
names are known. |
In addition, the prop editor has the following fields:
Ghost
Check this box to make the prop a ghost prop. A ghost is a semi-transparent prop: other
props and background art can be seen faintly through it. Any prop may be made into a ghost
prop.
Rare
Check this box to create a prop that cannot be copied. Unlike normal props, rare props
disappear from the satchel when they are donned. In other words, only ONE such prop can
exist.
Anim
Check this box to make your prop into a single frame for animation. An animated prop is
like a frame in a small movie: when worn, it rapidly flashes on and off. If more than one
animated prop is worn, they will flash in sequence, creating the illusion of animation.
The following Bounce setting can modify the order of the
sequence. To see animated props in action, select Preferences
from the Edit Menu and check Allow Animation.
Bounce
If this option is checked for any prop you are wearing, your animated props will cycle
on and off in "palindrome" fashion ("forward-backward-forward" etc.),
instead of simply looping in the "forward" direction all the time.
Cancel
Closes the Prop Editor without saving any changes you have made.
It is the only way to "undo" any errors you made in the prop editor.
OK
Saves your work to a temporary file and closes the Prop Editor,
to make sure your new prop is really saved: close the Palace Client.
Offcourse you can immediately restart it after. Don't forget to remeber
in wich Palace you where chatting.


